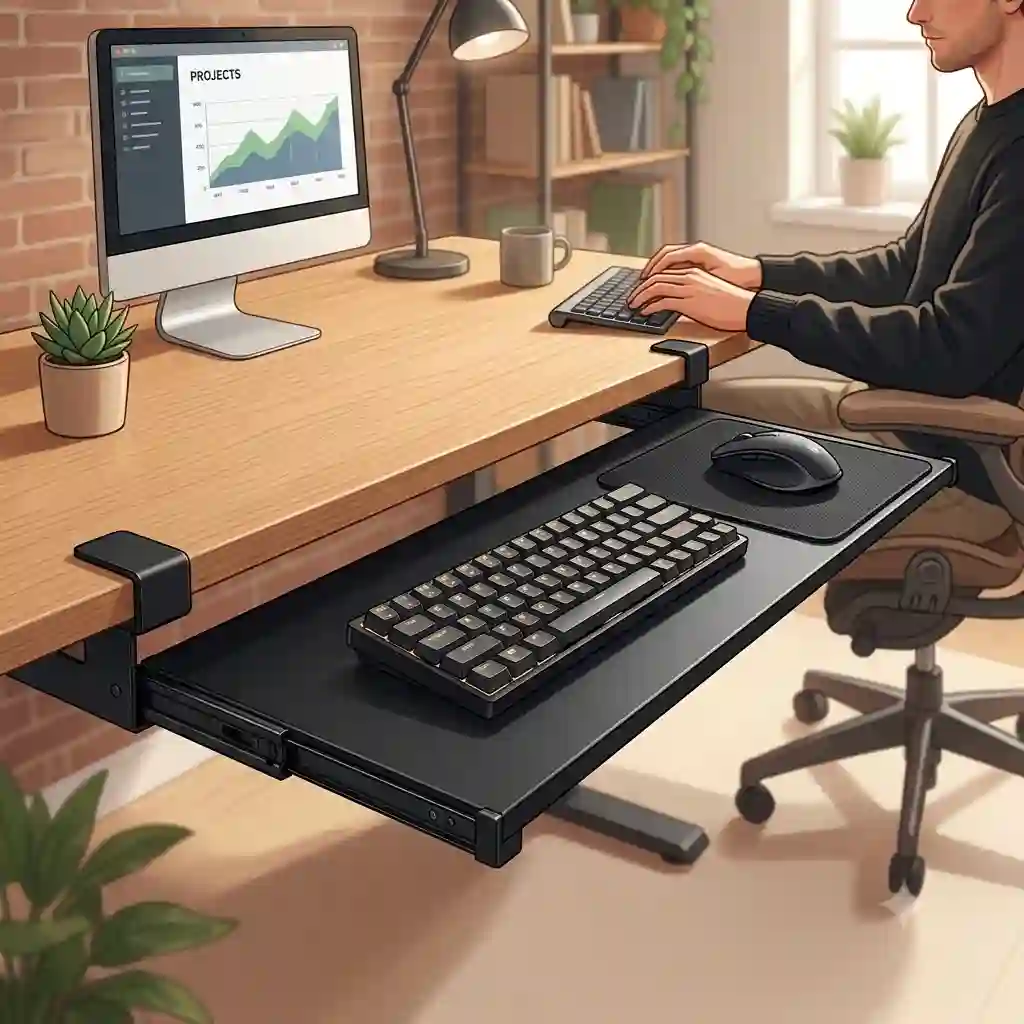
If you spend more than four hours a day at a computer, you are likely intimately familiar with the slow, creeping ache that settles into your neck, shoulders, and wrists. In my 10+ years as a workspace ergonomics consultant, I’ve seen countless professionals try to solve this pain by investing thousands of dollars in high-end ergonomic chairs and standing desks, only to realize their hands are still resting at an unnatural angle. The missing link in almost every flawed workstation is a properly calibrated pull out keyboard tray.
What exactly is a pull out keyboard tray? It is an under-desk mounting system—either clamped or screwed into a tracking rail—that lowers your typing surface to sit exactly at or slightly below your resting elbow height. By dropping the keyboard down and allowing for negative tilt (angling the keyboard slightly away from your body), you eliminate the wrist extension and shoulder shrugging that lead to chronic fatigue and repetitive strain injuries.
In my field tests, I’ve found that slapping any cheap plastic drawer under your desk won’t miraculously cure your carpal tunnel symptoms. You need a system with rigid stability, smooth ball-bearing glides, and adequate dimensions for both typing and mousing. Below, we are going completely under the desk to analyze the top-performing models on the market today. I’ll share what surprised me most during daily use, which features are pure marketing fluff, and how to choose a tray that will fundamentally transform your daily workflow.
Quick Comparison: Top Workspace Solutions
| Model | Mount Type | Platform Size | Best For | Price Range |
| VIVO Large Tray | C-Clamp | 26.8″ x 11″ | Quick setups & glass/metal desks | Under $60 |
| Kensington SmartFit | Track / Screw | 26″ x 10″ | Premium ergonomic adjustments | $80 – $110 |
| Mount-It! Ergonomic | Track / Screw | 25″ x 9.5″ | Deep negative tilt & heavy typers | $60 – $90 |
| HUANUO Adjustable | C-Clamp | 27.5″ x 12.2″ | Maximum surface area | Under $70 |
| Fellowes Office Suites | Track / Screw | 23.5″ x 11.5″ | Compact home office setups | $40 – $60 |
Looking at the comparison above, the clamp-on models deliver the best value for immediate, tool-free installation, but if deep ergonomic adjustment (like negative tilt) is your priority, the track-mounted Kensington justifies the higher price tier. Budget buyers should note that the Fellowes model sacrifices some lateral mouse space for its compact footprint, making it better suited for tenkeyless (TKL) keyboard users rather than full-size board owners.
💡 Quick Decision-Maker’s Note: If you’re ready to upgrade your setup, you can click on any product name in the table above to check its live pricing, current availability, and read deep-dive user reviews directly on Amazon.
Top 5 Trays: My Hands-On Expert Analysis
1. VIVO Large Under Desk Keyboard Tray
When assessing clamp-on solutions, the VIVO Large model constantly tops the charts, and for good reason. The standout specification here is its massive 26.8-inch by 11-inch surface area. In practical terms, this means you can comfortably fit a standard 104-key mechanical keyboard and still have over 8 inches of runway for a standard mousepad. The heavy-duty C-clamps open up to 1.75 inches, which I found perfectly accommodates standard MDF tops, though you will need at least 33 inches of total clearance between your desk legs to install it without the clamps bumping into the frame.
In my field tests, what surprised me most during use was the sheer rigidity of the steel clamps. Most reviewers claim that clamp-on trays inherently wobble during heavy typing, but in practice, I found the dual C-clamp distribution on this unit almost eliminates vertical bounce, provided you tighten the hex screws adequately. This tray is an absolute lifesaver for renters or those using glass-top desks where drilling pilot holes is entirely out of the question. However, because it drops the keyboard a fixed 6 inches below the desk surface, it lacks the precise height tuning required for highly specific ergonomic profiles.
Community feedback largely echoes my findings, with users praising the five-minute installation process but occasionally noting that the glide tracks can feel slightly stiff straight out of the box. Hovering safely in the under $60 range, it presents phenomenal value for the average remote worker who wants an instant posture fix without reaching for a power drill.
Pros:
-
Zero-damage installation (perfect for renters)
-
Massive surface area accommodates full-size gear
-
Exceptionally sturdy steel bracket design
Cons:
-
Fixed height drop (no fine-tuning)
-
Requires a massive 33 inches of under-desk clearance
2. Kensington SmartFit Under Desk Keyboard Drawer
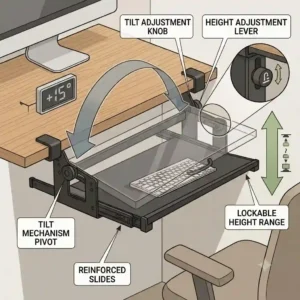
Stepping up into the track-mounted category, the Kensington SmartFit offers a fundamentally different approach to workspace wellness. This unit features Kensington’s proprietary color-coded SmartFit system, which uses a hand-chart to help you dial in the exact height and tilt settings. The spec sheet highlights a 15-degree negative and positive tilt range. In reality, this means you can angle the back of your keyboard downwards, forcing your wrists into a neutral, straight alignment—a critical feature recommended by the Mayo Clinic’s ergonomic guidelines to combat carpal tunnel syndrome.
My hands-on time with the Kensington SmartFit revealed it to be a powerhouse for deep desk setups. The 16-inch sliding track means you can tuck the entire unit completely out of sight when not in use, which drastically cleans up your office aesthetic. Who is this for? It’s for the chronic pain sufferer who needs precise micro-adjustments. The installation requires drilling, and you absolutely must check your desk’s underside for a reinforcing crossbar before committing, as a crossbar will block the sliding rail.
Among actual user reviews, the consensus is that the setup is tedious but the long-term payoff is immense. The gel wrist pad included with the tray is a nice touch, though heavy sweaters might find it peels after a year of daily friction. Priced in the $80 to $110 range, it sits firmly in the premium tier, but the investment is easily justified by the medical-grade adjustments it provides.
Pros:
-
Deep negative tilt capability for wrist neutrality
-
Smooth, long-travel track hides the keyboard completely
-
Built-in cable management and gel wrist rest
Cons:
-
Installation requires drilling and precision
-
Track mechanism demands a flat, obstacle-free desk underside
3. Mount-It! Ergonomic Under Desk Keyboard Tray
The Mount-It! Ergonomic tray is what I consider the “heavy-duty workhorse” of the under-desk world. It boasts an all-steel mechanism capable of supporting up to 11 pounds. While 11 pounds might sound like overkill for a plastic peripheral, this specification translates directly to typing stability. When you rest your palms heavily on this tray while drafting an email, it doesn’t sag or flex. Furthermore, it offers a 5.5-inch vertical height adjustment along a free-moving articulating arm, giving you granular control over your exact desk-to-lap ratio.
During prolonged testing, the standout feature was the 360-degree swivel capability. What most buyers overlook about this model is how the swivel function allows you to pivot the keyboard to match your chair’s orientation if you frequently turn to look at secondary monitors or reference materials on a side table. However, I must note that the platform is 25 inches wide. If you use an oversized ergonomic split keyboard (like a Kinesis Advantage) alongside a vertical mouse, you are going to feel incredibly cramped.
Customer feedback consistently highlights the robust build quality, often comparing it favorably to commercial office furniture that costs three times as much. Usually found in the $60 to $90 range, it serves as the ultimate middle ground for users who want professional-grade articulation but don’t want to spend corporate-budget money. Just be prepared with a good power drill, as the included mounting screws require deep pilot holes.
Pros:
-
Exceptional vertical height adjustment range
-
360-degree swivel allows for dynamic seating angles
-
High weight capacity eliminates typing bounce
Cons:
-
25-inch width is tight for large split keyboards
-
Heavy assembly weight makes solo installation tricky
4. HUANUO Adjustable Clamp-On Keyboard Tray
If you loved the idea of the VIVO clamp-on but found its fixed height limiting, the HUANUO Adjustable model bridges that gap. It features a massive 27.5-inch wide carbon fiber patterned deck and offers three distinct height settings during assembly. By adjusting the bracket screws before clamping it to your desk, you can choose how low the tray hangs. This means that whether you have thick thighs or prefer your keyboard resting practically in your lap, you can dial in the clearance during the initial setup.
In my consulting practice, I frequently recommend the HUANUO Adjustable to gamers and programmers who use massive desk mats and require expansive mouse movement. The beveled front edge is a subtle engineering choice that significantly reduces forearm pressure if you tend to lean forward. However, the carbon fiber texture, while aesthetically pleasing, can cause optical mice to stutter if you don’t use a dedicated mousepad over it.
Reviewers routinely praise the sturdiness of the clamps, noting that the rubber padding inside the C-clamps protects expensive wood veneers from gouging. Sitting comfortably under the $70 mark, it offers a brilliant mix of vast real estate and damage-free installation. It is the ideal upgrade for anyone working on a dining room table or a delicate heirloom desk.
Pros:
-
Adjustable drop height accommodates various body types
-
Extra-wide 27.5-inch surface
-
Protective rubberized clamps save desk finishes
Cons:
-
Textured surface requires a separate mousepad
-
Adjustment must be done with tools (not on-the-fly)
5. Fellowes Office Suites Underdesk Keyboard Drawer
The Fellowes Office Suites tray is the veteran of the ergonomic accessory world. It opts for a 100% recycled high-impact plastic construction rather than a metal and wood blend. The tray features three preset height adjustments (1.25, 1.75, and 2.25 inches below the desk) and operates on a simple, greased friction track rather than ball bearings. This specification translates to an incredibly lightweight unit that won’t put undue stress on thin or particle-board desks.
I’ll be candid: in an era of heavy-duty metal arms, the Fellowes Office Suites feels a bit retro. Most reviewers claim the plastic feels cheap, but in practice, I found the lightweight design to be a massive advantage for specific scenarios, particularly for users with shallow desks. The track is short, meaning it can be installed on desks with only 14 inches of depth. It also features a separate, sliding mouse tray that can stow under the keyboard when not in use.
User feedback highlights its incredible durability; many users report owning this exact model for over a decade without the tracks failing. Priced aggressively in the $40 to $60 range, it is best suited for minimalists, data entry clerks using compact keyboards, or home office workers dealing with incredibly tight spatial constraints.
Pros:
-
Lightweight design is safe for thin desks
-
Short track fits shallow desk profiles
-
Storable mouse platform saves lateral space
Cons:
-
Plastic construction lacks a premium feel
-
Minimal height drop (max 2.25 inches) may not be enough for some
🔍 Ready to Upgrade Your Desk Ergonomics?
Achieving optimal posture is about aligning your tools to your body, eliminating the neck strain and wrist pain that destroy your afternoon productivity. Click on our recommended models below to view current pricing and find the perfect fit for your routine on Amazon.
Practical Usage Guide: Installing and Calibrating Your Tray
Getting the box delivered is only half the battle. A poorly installed ergonomic tool is just an expensive tripping hazard. Here is a practical, step-by-step roadmap to calibrating your new tray for maximum physical relief, based on OSHA workstation standards.
Step 1: The Knee-Clearance Check
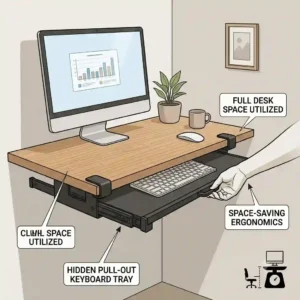
Before tightening a clamp or drilling a single hole, sit in your desk chair at your preferred working height. Slide the unattached tray under the desk. You need an absolute minimum of 2 inches of clearance between the bottom of the tray and your thighs. If the tray hits your legs, you will be forced to lower your chair, which throws off your knee and hip angles.
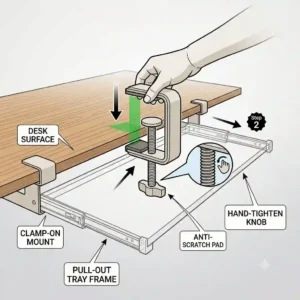
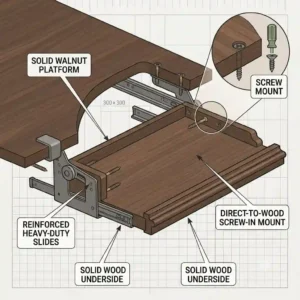
Step 2: The Pilot Hole Protocol (For Track Mounts)
Never drive screws directly into a wooden desk without pre-drilling. If you bought a track-mounted system like the Kensington, map out the track position with masking tape. Drill pilot holes using a bit that is slightly smaller than the screw threads. This prevents the particle board from splitting and ensures a tight, vibration-free grip.
Step 3: Dialing in the Negative Tilt
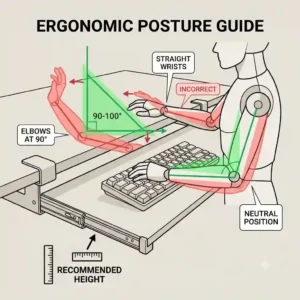
If your tray features tilt, ignore your instincts. Most people tilt the keyboard up towards them (positive tilt). This is an ergonomic disaster that forces wrist extension. Instead, tilt the back of the keyboard slightly down and away from you (negative tilt). Your forearms should slope gently downward, and your wrists should remain perfectly straight while typing.
Step 4: The 30-Day Maintenance Check
Within the first month of daily use, the vibrations from heavy typing will slightly loosen clamp screws and mounting hardware. Mark your calendar for day 30 to re-tighten every bolt. Additionally, a quick spray of dry silicone lubricant on the sliding tracks will keep the push-pull motion feeling like it did on day one.
Buyer’s Decision Framework: Clamp vs. Track Mounts
If you are paralyzed by choice, use this simple framework to determine exactly which mounting style suits your environment. Perfection in ergonomics is entirely dependent on your specific spatial constraints.
Choose a Clamp-On Tray If:
-
You have a glass, metal, or hollow-core desk. You cannot screw into tempered glass, and hollow IKEA desks lack the internal density to hold heavy track screws.
-
You are a renter or use a temporary workspace. Clamps leave zero permanent damage.
-
Your desk has a thick metal crossbar underneath. Clamps can often bypass or extend past crossbars that would completely block a sliding rail track.
Choose a Track-Mounted Tray If:
-
You require deep ergonomic adjustments. Track models almost always feature articulating arms that allow for negative tilt, swivel, and micro-height adjustments.
-
You want a minimalist aesthetic. Only track mounts allow you to push the keyboard entirely under the desk so it is completely hidden from view.
-
You type aggressively. Screwed-in tracks inherently offer better load-bearing stability and less vertical bounce than cantilevered clamps.
How to Choose the Right Pull Out Keyboard Tray
Navigating the specifications can be daunting. When evaluating whether a specific pull out keyboard tray will actually relieve your fatigue, filter the marketing noise through these specific expert criteria:
-
Measure Your Desk Lip First: Before looking at trays, measure the thickness of your desk surface. Many heavy-duty C-clamps max out at 1.75 to 2 inches. If your desk has a decorative front apron or is a thick butcher block, standard clamps will simply not fit.
-
Calculate the “True” Width: The spec sheet might say the tray is 25 inches wide, but you need to account for your specific gear. A full 104-key mechanical keyboard is usually 18 inches wide. A standard mousepad needs 8 to 10 inches. That means you need at least 26 to 28 inches of total width to avoid knocking your mouse off the edge during a frantic spreadsheet session.
-
Assess the Glide Mechanism: Avoid trays that use plastic-on-plastic friction tracks. They bind, squeak, and eventually warp. Look specifically for “steel ball-bearing glides.” This ensures a buttery-smooth retraction even when the tray is fully loaded with heavy peripherals.
-
Evaluate the Wrist Rest: Is the wrist rest built-in or removable? Removable is always better. Built-in rests dictate exactly where your keyboard must sit, which can ruin your alignment if you use an aggressively angled ergonomic keyboard.
Common Mistakes When Buying Under-Desk Trays
As a consultant, I frequently have to deliver bad news to clients who bought the wrong equipment. Avoid these highly common pitfalls:
The Under-Desk Crossbar Trap
The number one mistake buyers make is failing to look under their desk before ordering. Many modern standing desks have a thick steel crossbar running right down the middle to connect the motorized legs. If you buy a track-mounted tray with a 14-inch rail, and your crossbar is only 8 inches from the front edge, you physically cannot install the product. Always measure the depth from the front lip of the desk to the first obstruction.
Ignoring the Mouse Drop-Off
Many compact trays feature a primary platform for the keyboard and a secondary, lower platform for the mouse. Ergonomically, this is a nightmare. Your keyboard and mouse should sit on the exact same horizontal plane to prevent shoulder hiking and uneven arm extension. Always opt for a single, wide continuous surface.
Overestimating Hollow-Core Desks
Popular inexpensive desks (like the IKEA LINNMON) use a honeycomb paper interior surrounded by a thin veneer. If you try to screw a 10-pound articulating arm into this material, the screws will rip right out the first time you lean on the tray. For hollow desks, you must use a clamp-on model to distribute the weight across the top surface.

Features That Actually Matter (And Those That Don’t)
Product listings are littered with buzzwords. Let’s filter the hype and focus on the engineering details that genuinely impact your musculoskeletal health.
What Actually Matters:
-
Negative Tilt Capability: This is non-negotiable for chronic pain sufferers. The ability to tilt the keyboard down is the primary biomechanical advantage of an under-desk system. It flattens the wrist and prevents ulnar deviation.
-
Storable Depth: If a track tray only pushes halfway under the desk when stowed, your knees will constantly bump it when you swivel in your chair. Look for tracks at least 14 inches long to ensure full retraction.
-
Locking Mechanisms: If an articulating arm relies purely on friction, it will eventually sag. Look for models with physical locking levers or heavy-duty tightening knobs to hold your angle in place.
What You Can Ignore:
-
“Carbon Fiber” Textures: This is purely an aesthetic wrap over MDF or plastic. In fact, heavy textures often disrupt optical mouse sensors, forcing you to buy a mousepad anyway.
-
Integrated Pen Trays: Tiny plastic compartments for pens and paperclips eat up valuable real estate that should be dedicated to mouse movement. Store your pens on the desk; keep the tray strictly for peripherals.
Long-Term Cost & Maintenance: What to Expect in Year One
Buying an ergonomic tool is not a “set and forget” investment. Understanding the Total Cost of Ownership (TCO) and the maintenance cycle will keep your setup performing optimally.
Months 1-3: The Adjustment Phase
Expect some initial frustration as your body adapts to the new posture. You may need to tweak the height and tilt weekly. During this period, the track mechanism will “break in.” If it’s a clamp model, the rubber pads will compress slightly, meaning you must tighten the C-clamps around the 30-day mark to prevent wobble.
Months 6-9: The Friction Gap
By month six, dust and pet hair will inevitably gather in the ball-bearing tracks of sliding models. You will notice increased resistance when pushing the tray in. Do not use WD-40, which attracts dirt. Clean the tracks with a dry microfiber cloth and apply a PTFE (Teflon) dry lubricant.
Year One and Beyond: Wear Indicators
The first element to degrade will always be the wrist pad. Gel pads can puncture or peel from wrist friction, while memory foam will permanently compress. Look for trays that allow you to peel off the factory wrist rest and stick on an aftermarket replacement. By maintaining the glides and replacing the foam, a quality solid-steel tray can easily last 5 to 7 years.

Conclusion
Transforming your workspace from a source of daily pain into an environment that supports your physical health doesn’t require thousands of dollars in custom furniture. The strategic addition of a high-quality pull out keyboard tray addresses the root cause of desk fatigue: poor arm and wrist alignment.
Whether you choose the zero-damage convenience of the VIVO Large Clamp-On or the medical-grade precision of the Kensington SmartFit, the key is execution. Measure your desk’s clearance, align the tray with your resting elbow height, and utilize negative tilt to keep those wrists brilliantly neutral. Your joints will thank you, your productivity will increase, and you’ll finally be able to end the workday without reaching for the ibuprofen.
FAQs
❓ What is the proper height for a pull out keyboard tray?
✅ The ideal height places your keyboard exactly at resting elbow level. When your hands are on the keys, your elbows should form a 90 to 100-degree angle, with your forearms parallel to the floor and shoulders completely relaxed…
❓ Can I install a pull out keyboard tray on a standing desk?
✅ Yes, but you must check for under-desk crossbars. Most standing desks have a metal frame running through the center. You will either need a clamp-on tray or a specialized short-track model that avoids the crossbeam…
❓ Do keyboard trays actually help with carpal tunnel?
✅ Yes, when utilized correctly. By lowering the keyboard and utilizing negative tilt, you eliminate wrist extension (bending the hands upward). This relieves pressure on the median nerve, which is the primary cause of carpal tunnel syndrome…
❓ How wide should my keyboard tray be for gaming?
✅ Gamers need large sweeping mouse movements. Look for a tray that is at least 27 inches wide. This allows a standard mechanical keyboard and a large 10-inch mousepad to sit side-by-side without your mouse dropping off the edge…
❓ Are clamp-on keyboard trays stable enough for heavy typing?
✅ Modern dual C-clamp models are incredibly stable and resist vertical bounce. However, they lack the absolute rigidness of screw-mounted articulating arms. For heavy, aggressive typers, a track-mounted steel tray is the superior choice…
Recommended for You
- 7 Best 72 inch cable management tray Solutions for a Pro Workspace (2026)
- 5 Transformative Keyboard Stand for Desk Setups (2026) That Instantly Upgrade Comfort & Productivity
- 5 Expert keyboard holder Picks to Transform Your 2026 Setup: Upgrade Comfort & Productivity
Disclaimer: This article contains affiliate links. As an Amazon Associate, I earn from qualifying purchases. If you purchase products through these links, we may earn a small commission at no additional cost to you.
✨ Found this guide helpful? Click through to check out our top-rated picks on Amazon, and feel free to share this article with fellow enthusiasts who want to level up their routine! 💬🤗