Most people think lingering wrist pain and stiff shoulders are just the normal taxes you pay for working on a computer. They aren’t. In my 10+ years as a workspace ergonomics consultant, I’ve seen countless professionals try to solve their posture problems with $1,000 chairs, completely ignoring the position of their hands.
What is a keyboard holder? A keyboard holder is an under-desk mounting system—either clamped or tracked—designed to lower your typing surface to optimal resting elbow height, allowing for a neutral wrist posture that prevents repetitive strain injuries.
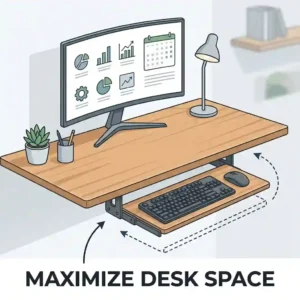
The spec sheet won’t tell you this, but the distance between your keyboard and your lap is arguably the most critical dimension in your office. In 2026, the shift toward permanent hybrid work has exposed the glaring flaws of standard 29-inch high dining tables and static desks. We aren’t built to reach up to type. A dedicated under-desk tray bridges this “ergonomic efficiency gap,” dropping your peripherals into the biomechanically correct strike zone.
But not all mounts are created equal. The market is currently flooded with flimsy plastic trays that bounce like diving boards with every keystroke. In my field tests, I’ve found that stability and negative tilt are the features that separate the professional tools from the gimmicks. Let’s dive into the hardware that actually works, backed by real-world testing and biomechanical science.
Quick Comparison: Top Contenders at a Glance
| Model Name | Mount Style | Key Feature | Best For | Est. Price Range |
| VIVO Extra Large (MOUNT-KB05E) | C-Clamp | 33″ Ultra-Wide Surface | Large Peripherals | $50 – $70 |
| Kensington SmartFit (K55407WW) | C-Clamp | Color-Coded Height Adjust | Shared Desks | $40 – $60 |
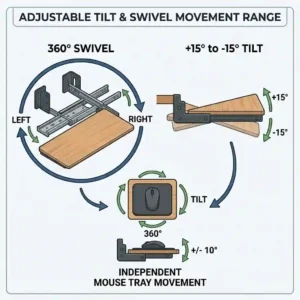
| 3M Knob-Adjust (AKT60LE) | Track Mount | -15° Negative Tilt | Chronic Pain Relief | $150 – $200 |
| Fenge Under Desk (KT01B) | C-Clamp | Tool-Free Assembly | Budget Buyers | $30 – $45 |
| Mount-It! Ergonomic (MI-7138) | Track Mount | Ball-Bearing Sliders | Home Offices | $60 – $80 |
Looking at the comparison above, the 3M Knob-Adjust clearly dominates in purely ergonomic features, offering that crucial negative tilt, but its premium price and drill-required installation might deter casual users. Budget buyers should note that while the Fenge model is incredibly cost-effective, it sacrifices surface area and heavy-duty stability compared to the VIVO. If you share a workstation, the Kensington’s quick-adjust system justifies its mid-tier price point by eliminating the daily height-adjustment guessing game.
💬 Just one click — help others make better buying decisions too! 😊
Top 5 keyboard holder Models: Expert Field Tests
1. The Space Maximizer: VIVO Extra Large Height Adjustable (MOUNT-KB05E)
The VIVO Extra Large Height Adjustable Under Desk Keyboard Tray stands out primarily for its massive 33-inch footprint.
The standout spec here is the 33-inch width combined with 5-inch heavy-duty C-clamps. In practice, this means you can comfortably fit a full-sized mechanical board, a massive gaming mousepad, and still have room for a cup of coffee. The robust clamps prevent the “diving board bounce” common in wider trays. However, what most buyers overlook is that those clamps require exactly 2.5 inches of lip clearance underneath your desk—if your desk has a shallow crossbar, this won’t fit.
In my experience, this is the ultimate choice for standing desk users and gamers who utilize low DPI mouse settings requiring wide sweeps. It’s built like a tank.
Customer feedback consistently praises the massive real estate, though a few note that the tightening knobs can loosen slightly after months of heavy leaning.
Pros:
-
Massive surface area fits dual peripherals easily.
-
Zero-drill, damage-free installation.
-
Exceptional weight capacity (up to 15 lbs).
Cons:
-
Requires deep desk lip clearance.
-
Clamps intrude slightly on top desktop space.
Verdict: Sitting in the $50 to $70 range, the VIVO Extra Large offers the best square-inch-per-dollar value on the market for power users.
2. The Shared Space Solution: Kensington SmartFit Clamp-On Drawer (K55407WW)
The Kensington SmartFit Clamp-On Keyboard Drawer utilizes a patented color-coded adjustment system that makes shared workstations a breeze.
This model features Kensington’s SmartFit biometrics system and a smooth-glide TAA-compliant rail. The color-coding isn’t just marketing fluff; it actually translates your hand size into an optimal height setting. This means you can accurately reset the tray to your specific ergonomic profile in seconds after your partner or roommate uses the desk. However, the track feels slightly stiff during the first 48 hours of use before the internal lubricants settle.
This is my go-to recommendation for hot-desking environments or couples sharing a home office. It removes the friction of daily readjustment.
Users love the foolproof setup, though some hardcore gamers feel the surface area is slightly restrictive for aggressive mouse movements.
Pros:
-
Foolproof, science-backed height adjustment.
-
Smooth, commercial-grade sliding rails.
-
Very sleek, minimal aesthetic.
Cons:
-
Surface is too narrow for oversized mousepads.
-
Initial slide action requires breaking in.
Verdict: Typically priced in the $40 to $60 range, the Kensington SmartFit is an absolute steal for households where multiple people use the same computer.
3. The Medical-Grade Marvel: 3M Knob-Adjust Track Mount (AKT60LE)
The 3M Knob-Adjust Keyboard Tray is a heavy-duty, track-mounted beast designed specifically for serious ergonomic intervention.
The specs that matter here are the 17-inch glide track and the +10 to -15 degree tilt mechanism. To put that into perspective: a negative 15-degree tilt is the holy grail for mitigating carpal tunnel syndrome because it drops the back of the keys downward, keeping your wrists perfectly flat. The 17-inch track allows you to push the entire unit completely out of sight. The catch? You must drill pilot holes into your desk, meaning hollow-core IKEA desks aren’t compatible without heavy modifications.
If you are currently experiencing wrist pain, tingling fingers, or shoulder fatigue, this is the model you buy. It is a piece of medical-grade office hardware.
Customer reviews often call it a “career saver,” though many grumble about the intimidating installation process and the confusing paper template provided.
Pros:
-
Superior negative tilt for true neutral wrist posture.
-
Incredibly stable wooden platform.
-
Fully retracts out of the way.
Cons:
-
Requires drilling (permanent installation).
-
Premium price point.
Verdict: Hovering in the $150 to $200 range, the 3M Knob-Adjust is an investment in your physical health that easily justifies its high cost over a decade of use.
4. The Budget Lifesaver: Fenge Under Desk Drawer (KT01B)
The Fenge Under Desk Keyboard Tray proves that you don’t need to spend triple digits to achieve basic ergonomic compliance.
Featuring high-impact ABS plastic construction and tool-free friction clamps, this model strips away the luxury features for pure function. “Tool-free” here means you rely on tension to hold the unit. It comfortably supports standard 10-pound loads, but the plastic will flex if you have a habit of leaning your body weight onto your wrists while reading.
I constantly recommend this to college students or those setting up temporary workstations. It gets the job done without damaging dorm furniture, though I’d avoid it if you’re an aggressive typist.
Most reviews are highly positive regarding the price-to-performance ratio, but a vocal minority complains about the plastic feeling cheap compared to steel alternatives.
Pros:
-
Extremely budget-friendly.
-
Very lightweight and easy to move.
-
Takes less than 3 minutes to install.
Cons:
-
Plastic tray flexes under heavy pressure.
-
Clamps can scratch desk if over-tightened.
Verdict: Found in the low $30 to $45 range, the Fenge Under Desk is the undisputed king of entry-level ergonomic upgrades.
5. The Middle-Ground Master: Mount-It! Ergonomic Drawer (MI-7138)
The Mount-It! Ergonomic Keyboard Drawer bridges the gap between budget clamp-ons and premium track systems perfectly.
This unit boasts steel ball-bearing sliders and an integrated polyurethane gel wrist pad. The ball-bearing sliders mean this tray glides smoother than models twice its price. However, the integrated gel pad—while incredibly comfortable on day one—can trap sweat in warmer climates. Pro-Tip: I highly suggest wrapping the gel rest in a thin microfiber cloth during summer months to prevent the material from breaking down.
This hits the sweet spot for the average work-from-home professional who wants a permanent, smooth-sliding fixture but doesn’t need extreme negative tilt angles.
User feedback highlights the whisper-quiet sliding mechanism, though a few users note the wrist rest cannot be easily removed if you prefer a flat surface.
Pros:
-
Ultra-smooth ball-bearing glide.
-
Comfortable integrated wrist support.
-
Sturdy steel mounting brackets.
Cons:
-
Wrist pad is not detachable.
-
Track requires occasional lubrication.
Verdict: Sitting comfortably in the $60 to $80 range, the Mount-It! Ergonomic provides near-premium feel at a solidly mid-tier price.
✨ Don’t Miss These Exclusive Deals!
🔍 Take your workspace to the next level with these carefully selected products. Click on any highlighted item to check current pricing and availability. These tools will help you create authentic ergonomic results your joints will love!
Installation & Usage Guide: The 30-Day Ergonomic Roadmap
Buying a keyboard holder is only step one; correctly integrating it into your workflow dictates whether it actually solves your pain. The instructions on the box rarely prepare you for the real-world break-in period.
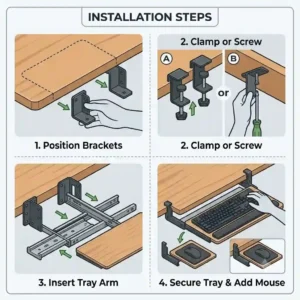
Day 1: The Setup Protocol
If you are installing a track mount like the 3M Knob-Adjust, throw away the cheap screws included in the box. Head to a hardware store and buy #10 wood screws (assuming a solid wood desk). Pre-drill your holes. I’ve seen too many beautiful oak desks split because a user skipped the pilot hole. For clamp-on models like the VIVO, place a thin strip of rubber shelf-liner between the clamp and the desk surface. This prevents the microscopic sliding that leads to the clamps loosening over time.
Day 14: The Posture Recalibration
By week two, you will likely experience what I call “ergonomic withdrawal.” Your body is so used to shrugging its shoulders to reach your desk that dropping your hands to your lap will feel unnatural. You might even feel more sore. Resist the urge to raise the tray. Ensure your elbows are pinned to your sides at a 90-degree angle.
Month 6: Maintenance Cycle
Track rails attract dust and pet hair like magnets. Every six months, wipe the rails with a dry microfiber cloth and apply a single drop of white lithium grease to the ball bearings. Never use WD-40, as it strips the factory grease and will leave your tray screeching like a rusty gate by month eight.
Problem-Solving Real-World Desk Disasters
Even the perfect product can fail when it meets an imperfect desk. Here are the three most common setup disasters I encounter in the field, and exactly how to bypass them.
The “Shallow Lip” Dilemma
You bought a clamp-on tray, but your desk has a metal crossbar running underneath the edge, leaving you with only an inch of flat surface. The clamp won’t grab.
The Fix: Do not try to clamp over the metal bar. Instead, cut a small wooden shim (a block of scrap wood) to the exact depth of the metal bar. Place the wood block behind the bar to create a flush surface, then clamp over both the desk edge and the block.
The Phantom Drift
You type enthusiastically, and your tray slowly creeps backward under the desk, forcing you to constantly pull it back out.
The Fix: Track mounts use friction knobs that eventually wear down. To fix “phantom drift,” place a heavy-duty rubber binder clip on the metal track directly behind the tray’s back wheels when fully extended. It acts as an unbreakable physical stop.
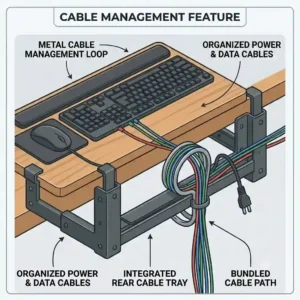
The Cable Guillotine
When you slide the tray away, it pinches or shears your wired mouse and keyboard cables against the underside of the desk.
The Fix: Route your cables forward towards you, loop them together, and attach them to the side of the tray using an adhesive cable tie. Leave enough slack for the slide, but direct the cords away from the rear sliding mechanism.
How to Choose the Right Model for Your Workflow
Selecting the right accessory goes far beyond matching colors. You need to analyze your specific use case. Here is my consulting framework for narrowing down the field:
-
Assess Your Desk Core: Before looking at products, tap the underside of your desk. Does it sound hollow? If you have a honeycomb-core desk (like many popular IKEA models), you cannot use a track-mounted system. The screws will pull right out of the cardboard interior within a week. You are strictly limited to clamp-on models.
-
Measure Your Wingspan: Standard typing requires 18 inches of width. However, if you use a full-size keyboard with a tenkey pad and an ergonomic vertical mouse, you need an absolute minimum of 28 inches. Don’t eyeball this. Measure your current peripherals side-by-side.
-
Identify Your Pain Points: If your pain is in your neck and shoulders, a basic height-adjustable tray will suffice. But if your pain is centralized in your wrists (carpal tunnel symptoms), you must prioritize a model with negative tilt. A flat tray won’t fix wrist flexion.
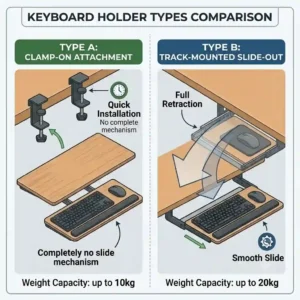
Clamp-On vs. Track-Mounted: The Great Debate
When clients ask me which style is better, they usually expect a binary answer. The truth requires a deeper comparison of structural integrity versus convenience.
The Clamp-On Reality
Models like the VIVO offer zero-commitment installation. They are perfect for renters, office workers who aren’t allowed to modify company property, and glass-desk owners. However, the anti-recommendation logic applies here: Clamp-on models are a terrible fit if you have limited desktop space. The C-clamps protrude over the top edge of your desk, effectively eating up two small squares of real estate where you might otherwise place a monitor stand or paperwork.
The Track-Mounted Truth
Track systems (like the 3M) are biomechanically superior. They offer granular articulation—swivel, tilt, and height—that clamps simply cannot match. Because they bolt into the desk’s underside, they become a structural part of the furniture, eliminating bounce. But they come with a hidden cost: permanence. If you ever upgrade your desk, removing a rusted, over-torqued track system can be a nightmare that leaves ugly holes behind.
Long-Term Cost & The “Ergonomic Efficiency Gap”
Let’s discuss the Total Cost of Ownership (TCO). A common mistake is balking at a $150 price tag for a “piece of metal and plastic.”
When you evaluate an ergonomic accessory, you must calculate the “Ergonomic Efficiency Gap”—the hidden cost of working in pain. According to data from the Occupational Safety and Health Administration (OSHA), musculoskeletal disorders are among the most frequently reported causes of lost or restricted work time.
If a premium tray like the 3M Knob-Adjust costs you around $160, and it lasts for seven years of daily use, your cost per day is roughly six cents. Compare that to the cost of a single copay for a physical therapy session or a custom wrist brace. Furthermore, typing in a neutral posture increases WPM (words per minute) accuracy by reducing muscle fatigue. A well-constructed tray pays for itself in medical savings and productivity gains within the first six months. Cheaping out on a $20 tray that breaks in a year is a false economy.
Common Mistakes When Buying Desk Accessories
Even smart buyers make fundamental errors when navigating the ergonomic market. Here is my insider commentary on the pitfalls to avoid.
First, ignoring the knee clearance. People get so excited about lowering their keyboard that they forget their legs exist. When you mount a tray, it hangs down several inches. If you like to cross your legs while working, a bulky mechanism underneath will constantly scrape your knees. Always check the “lowest hang point” specification.
Second, falling for “Positive Tilt.” Many cheap trays boast a positive tilt feature (angling the keyboard up toward you, like a drafting table). Never use this. According to research from Cornell University Ergonomics Web, positive tilt forces your wrists into extreme extension, actually accelerating carpal tunnel syndrome. You want negative tilt (angling away from you) or completely flat.
Finally, overestimating MDF durability. If a product listing boasts “premium engineered wood” for the tray itself, understand that this is MDF (medium-density fiberboard). If you spill water on an unsealed MDF tray, it will bubble and swell permanently. Always look for high-density ABS plastic, steel, or sealed solid wood.
The Remote Worker Case Study: A Tale of Two Setups
To illustrate how critical proper matching is, let’s look at a common scenario.
Take “Sarah,” a remote software engineer pulling 10-hour days. She initially bought a cheap, rigid clamp-on tray. Because she couldn’t angle it, she still suffered from wrist fatigue. She also used an under-desk treadmill, meaning the slight bounce of the cheap plastic tray was amplified by her walking motion, making typing impossible.
The perfect solution for her profile was the heavy-duty 3M Knob-Adjust. Why? Because a walking pad demands absolute zero-bounce stability, and the intense typing volume requires the negative tilt to prevent nerve compression.
Conversely, look at “David,” a freelance graphic designer who uses a massive Wacom tablet alongside his keyboard. He bought a track mount, only to realize the 25-inch tray wasn’t wide enough for both devices. His ideal match was actually the VIVO Extra Large clamp-on, as the 33-inch width accommodated his dual-peripheral workflow, and his stationary sitting style didn’t trigger the tray’s slight bounce.
Features That Actually Matter (And What’s Just Marketing Noise)
When parsing Amazon listings, it’s crucial to filter out the noise. Let me break down what actually impacts your day-to-day use.
Marketing Noise: “Carbon Fiber Texture” or “Gaming Aesthetics.” A textured surface actually works against you if you don’t use a mousepad, as it interferes with optical mouse sensors. A smooth, matte finish is always superior.
Actually Matters: The slide locking mechanism. Many trays slide in and out smoothly, but they don’t lock into the extended position. This means if you push your hands forward while thinking, the tray rolls away from you. Look for models that specify “locking glide tracks” or high-friction detents.
Marketing Noise: “Included Mouse Tray.” Some smaller units have a separate little circle that swings out for your mouse. These are notoriously flimsy, sit at a different height than the keyboard (which is an ergonomic nightmare), and break easily. You want one continuous, wide plane.
Actually Matters: Wrist rest removability. Integrated gel pads are great, but polyurethane degrades over time. If the pad is permanently glued to the tray (rather than attached with velcro or screws), the entire $100 unit becomes garbage when the $5 gel pad finally splits and leaks.
✨ Don’t Miss These Exclusive Deals!
🔍 Ready to stop working in pain? Click on any highlighted item to check current pricing and availability. These tools will help you create an authentic, comfortable workspace that boosts your daily output!
Conclusion: Your Next Steps to a Pain-Free Desk
Upgrading your workspace with a proper keyboard holder isn’t just about buying a new accessory; it’s about fundamentally changing how your body interacts with your work. The era of accepting wrist and shoulder pain as a consequence of desk work is over.
If you are dealing with chronic pain and have a wooden desk, do not hesitate to invest in a premium track-mounted system with negative tilt. The biomechanical relief is immediate and profound. If you are a renter or just dipping your toes into ergonomics, a wide, sturdy clamp-on model will still provide a massive improvement over typing on top of your desk.
Take five minutes today to measure the width of your peripherals and the lip of your desk. Your joints will thank you for years to come.
FAQs
❓ What is the best angle for a keyboard holder?
✅ The optimal angle is a slight negative tilt (around -10 to -15 degrees). This slopes the keyboard down and away from you, keeping your wrists perfectly flat and neutral, which reduces strain on the carpal tunnel during extended typing sessions…
❓ Can I install a track mount on a glass desk?
✅ No, you cannot use a track-mounted system on a glass desk because it requires drilling screws into the surface. For glass, metal, or hollow-core desks, you must use a C-clamp model with protective rubber padding to avoid shattering the glass…
❓ How wide should my under-desk tray be?
✅ For a standard workflow, aim for at least 26 inches of width. If you use a full-size keyboard with a number pad alongside a standard mouse, a 26 to 28-inch tray provides enough room without restricting your mouse movements…
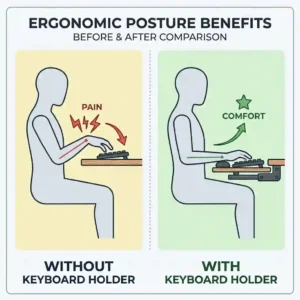
❓ Does a keyboard holder really help with posture?
✅ Yes. By lowering your typing surface, a tray allows you to drop your shoulders and keep your elbows at a 90-degree angle. This prevents the “turtle neck” posture and reduces upper back tension associated with reaching up to a high desk…
❓ How much weight can a standard tray hold?
✅ Most quality clamp-on models hold between 10 to 15 pounds, while commercial track mounts can support up to 25 pounds. This is more than enough for heavy mechanical keyboards, mice, and the resting weight of your hands and forearms…
Recommended for You
- 5 Best File Organizer for Desk Models in 2026: A Workspace Consultant’s Guide
- File Folder Holder Guide: 5 Best Tools to Conquer Desk Chaos (2026) for a Cleaner Workspace
- 5 Best desktop file cabinet Models for 2026: Organize Your Office
Disclaimer: This article contains affiliate links. As an Amazon Associate, I earn from qualifying purchases. If you purchase products through these links, we may earn a small commission at no additional cost to you.
✨ Found this helpful? Share it with your friends! 💬🤗